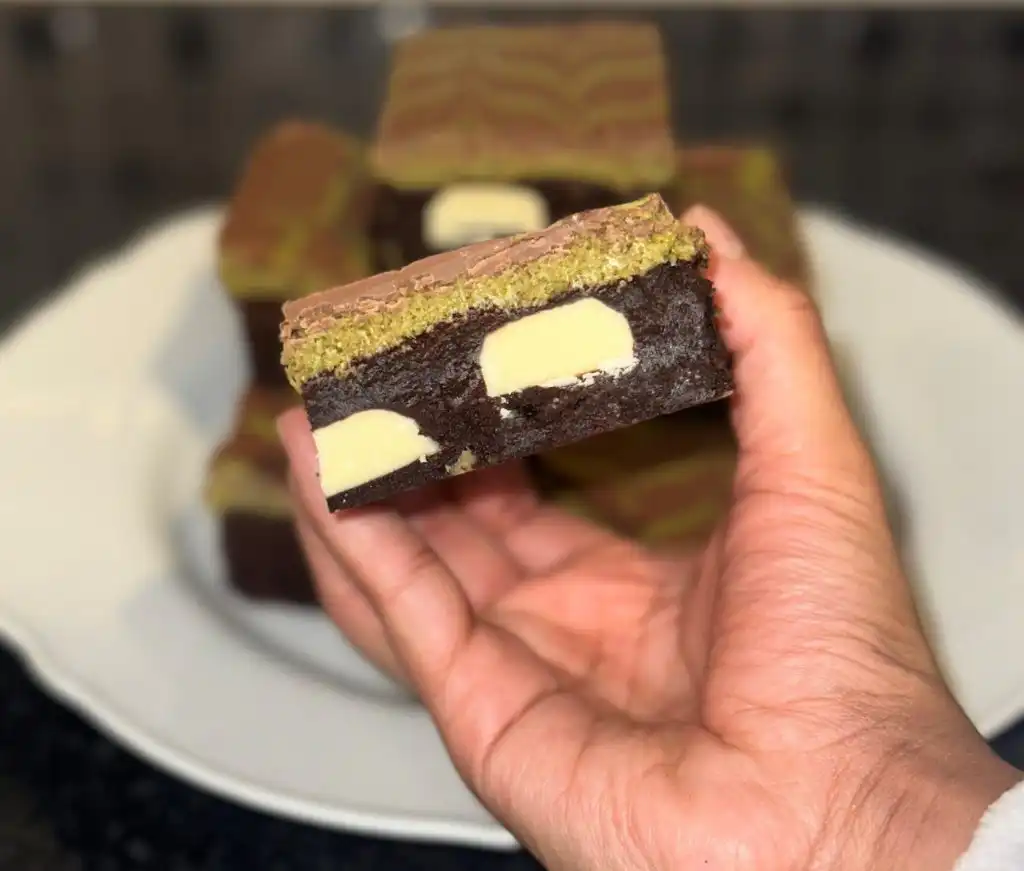
Dubai chocolate brownie recipe
Ingredients:
215 g dark chocolate
154 g butter
154 g light brown sugar
2 large eggs
74g plain flour
62g cocoa powder
200g kadayif (or shred some filo pastry if you cant find it)
4 heaped tbsp pistachio cream (add more if not enough)
2 tsp butter
150g milk chocolate
2 tsp melted pistachio cream
Method:
– Preheat your oven to 170°c
– Melt the chocolate and the butter together in the microwave in 30 second intervals until fully melted. Make sure you mix in between each interval
– Whisk the eggs and the sugar together until pale and fluffy and pour in the chocolate mix.
Fold the egg and chocolate mix together gently until fully incorporated.
– Sift in the flour and cocoa powder and fold in. Optional: add chocolate chunks into the mix (although I don’t think it was needed for this type of brownie)
– pour into a fully lined tin ( 7x7inch) and bake for 20-25 minutes until a skewer comes out a clean or if you want it more fudgey, until it resembles wet crumbs
– For the pistachio mix, chop the kadayif up into small pieces and melt the butter on a pan. Toast the kadayif for a few minutes until golden brown. Melt the pistachio spread and mix in until fully incorporated. Add more in it if not creamy enough)
– On top of the cooled brownie, place the pistachio mix and spread evenly.
– Melt some chocolate and pour on top.
Decorate with melted pistachio cream.
– Keep in the fridge for an hour, or until the chocolate is set and score the chocolate where you want to cut first before cutting it to ensure it doesn’t crack. Enjoy!🍫
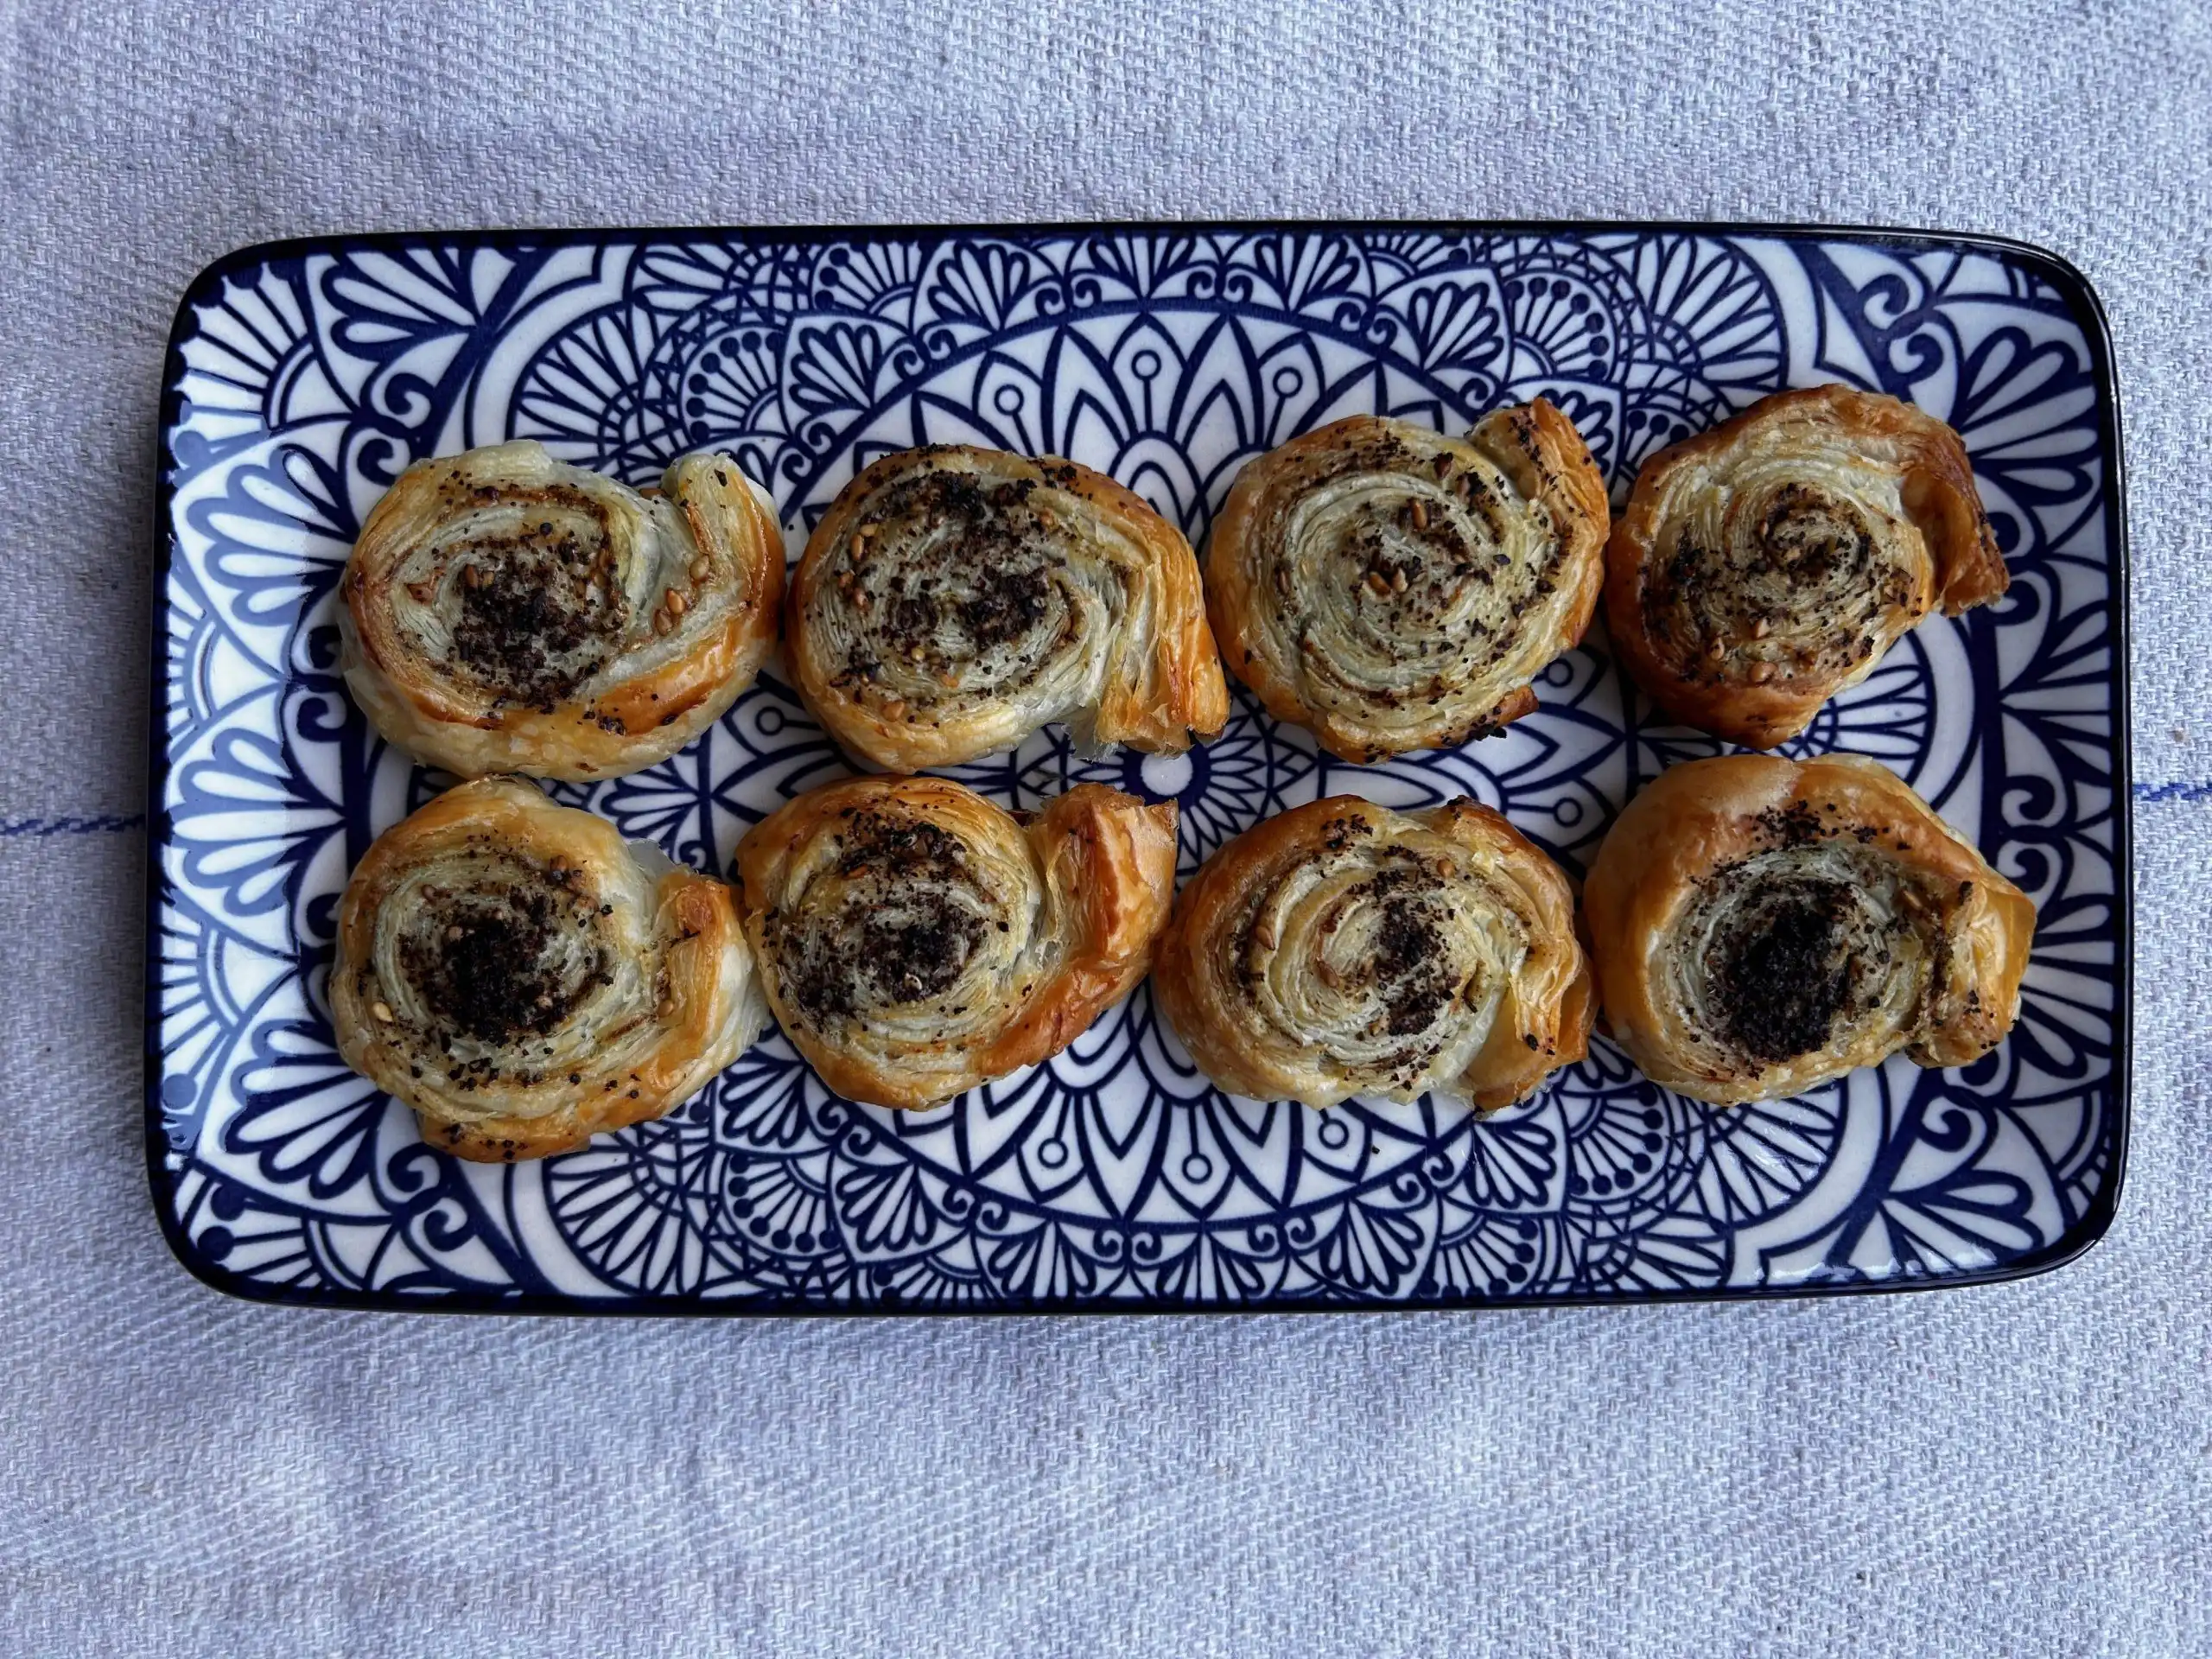
ZAATAR SWIRLS
These small savoury nibbles are a doddle to make however pack a punch with their herby and zingy flavours. Zaatar is the most iconic of Middle Eastern spice blends and is made up of dried thyme, oregano, sumac (a deep red lemony spice), sesame seeds and salt. Being rich in antioxidants, za’atar has many health benefits too and can boost the immune system, reduce inflammation and provide essential nutrients such as iron, vitamins and minerals. It’s available in all main supermarkets and apart from this recipe, can be used for marinades or simply mixed with some olive oil for a delicious dip to eat with bread. These swirls can be stored in the freezer so that they’re on hand to serve with drinks at short notice.
MAKES 18-20
1 Ready-rolled sheet of Puff Pastry
3 tbsp zaatar
4 tbsp olive oil
- Line a baking sheet with baking paper and preheat the oven to 200*C fan/ Gas mark 6.
- Unroll the pastry sheet and using a pastry brush, brush olive oil all over the pastry.
- Scatter the zaatar generously on top of the pastry, making sure to go as far as all the edges.
- Starting from the wider edge, roll the pastry over itself until you have a sausage shape approximately 36 cm long.
- With a serrated knife, trim the uneven edges on both sides, place on the baking sheet and flatten- they’ll be the cook’s treat.
- Slice the rest of the pastry sausage into pieces roughly 1.5cm thick and put them on the baking tray with the swirl side flat so that they look like mini cinnamon rolls.
- Brush these again with olive oil and scatter some more zaatar on top before baking in the oven for 15-20 minutes until golden brown and crispy.
- Leave to cool for 5 minutes then enjoy.
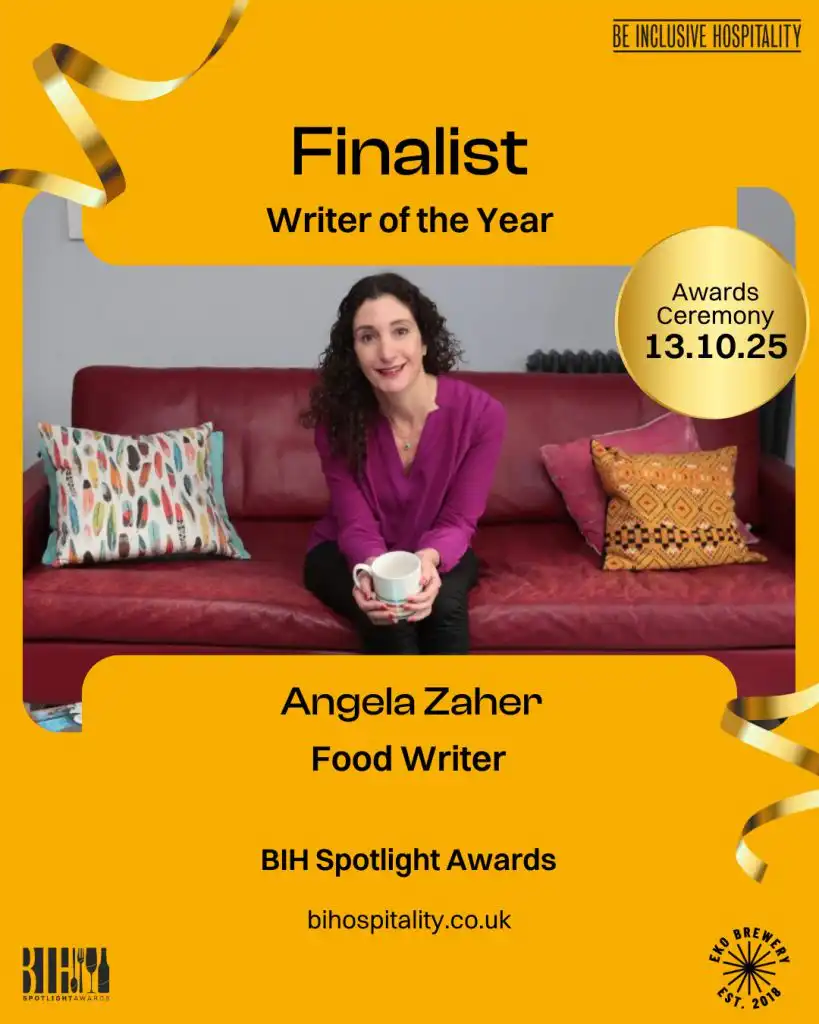
Angela is a freelance food writer whose articles and recipes have been published in outlets such as The Evening Standard, Good Housekeeping, Delicious and Business Insider. She’s a cookery columnist and regular restaurant reviewer for Time & Leisure Magazine. She was a finalist in the Writer of the Year category in the Be Inclusive Hospitality 2025 Awards and is on the Committee of the Guild of Food Writers. Follow her on instagram: @angela_zaher.

RICH CHOCOLATE TRUFFLE CAKE
This delightfully dense chocolate cake tends to be my go-to recipe when I need a quick-to-prepare, minimal fuss cake to serve when entertaining; however it works just as well as an afternoon tea treat. The liqueur is totally optional – and you can easily switch the flavour around depending on which liqueur used.
The best part of all is that the cake is packed full of flexible alternatives (see below) should you need to bake this for anyone with dietary requirements.
Gluten-free
Prep: 30 mins | Cooking: 40 mins |serves: 8-10
- 175g/6oz dark chocolate, 70% cocoa solids, broken into small pieces
- 175g/6oz butter
- 175g/6oz soft brown sugar
- 1 tsp vanilla paste or extract
- 6 large eggs
- 175g/6oz ground almonds
- 1 tsp vanilla paste or extract
- 2 tbsp of your chosen liqueur (optional) such as brandy, whisky, orange, almond, hazelnut, coconut or coffee liqueur
Heat the oven to 180C/160C fan/gas 4. Grease a 20cm/8 inch round cake tin with butter and line the base with a circle of baking parchment.
Gently melt the chocolate in a bowl over a pan of simmering water, or alternatively slowly melt in the microwave.
Beat together the butter, sugar and vanilla using an electric mixer, until it’s creamy and light in texture. Add the eggs, one at a time beating well after each addition. Pour in the melted chocolate in a steady stream, beating as you pour, until combined.
Fold in the ground almonds and chosen liqueur if using, then transfer to the prepared tin, levelling out the surface.
Bake for 35-40 minutes until risen and just firm in the centre, with a very slight wobble.
Leave in the tin for 10 minutes before sliding a table knife around the inside edge of the tin and removing the cake from the tin altogether to cool on a wire rack.
Serve at room temperature for a softer texture, or if you want a firmer cake, then serve chilled.
FLEXIBLE
Nut-free: the same weight of desiccated can be used as a nut-free alternative to ground almonds, however you can also use the same weight of plain flour, gluten-free flour or coconut flour.
Dairy-free: Use a plant-based butter alternative or margarine. Coconut oil can also be used which has a very distinctive taste and works really nicely with the addition of a coconut liqueur.
Alcohol-free: If you don’t want to use alcoholic liqueurs to add flavour, then you can add the finely grated zest of 1 orange, 1 tsp almond or coconut essence,
1 tsp orange blossom or rose water or 2 tbsp very strong espresso coffee.
Recipe by: Jo Pratt from The Flexible Baker, White Lion Publishing.
Photography: Malou Burger
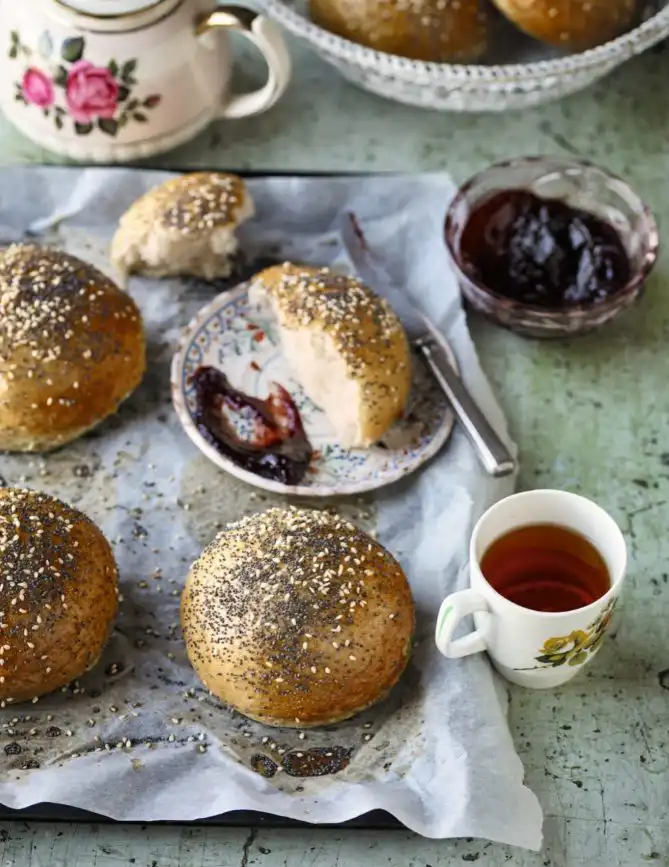
Fluffy Breakfast Buns (with Fruit Preserves)
By Ren Behan from The Sweet Polish Kitchen
These little buns are easy to make. They are a cross between a bun and a bagel, because you drop them into boiling water before baking. These are best served warm, gently pulled apart, with a thick layer of butter and a thick fruit jam. Even if you are not a baker, these homemade buns are worth a try.
Makes 8 buns
Ingredients
500g strong bread flour, plus extra for dusting
30g fresh yeast or 10g fast action dried yeast
1 tbsp sugar
350ml just-luke-warm water
4 tbsp unsalted butter, melted
1 tsp salt
To finish:
3 tsp bicarbonate of soda
1 tsp sea salt
1 egg yolk, beaten
2-3 tbsp of poppy seeds and sesame seeds
Method
In a jug, add combine 2 tablespoons of the flour with the yeast, sugar and half of the lukewarm water.
Gently stir, then set aside for 15 minutes in a warm place.
Sift the remaining flour into a large bowl, then add the yeast mixture, along with the rest of the water. Add the melted butter and the salt, and bring the mixture together. You can either do this by hand, or with a stand mixer fitted with a dough hook. Knead for five 5 minutes, until the dough is soft and elastic. Cover with a cloth and leave in a warm place for 1 hour. The dough should more or less double in size.
Tip the dough onto a surface lightly dusted with flour and cut into 8 portions. Form into little balls and flatten them slightly, then place them on a baking tray lined with a sheet of baking paper. Cover the buns with a cloth and leave them for a further 15–20 minutes.
Preheat your oven to 190°C/170°C Fan/Gas Mark 5/375°F
Bring a large pan of water (about 2 litres) to the boil. Add the bicarbonate of soda and salt. Drop in 2–3 buns at a time and cook for 30 seconds, flipping them over half-way through.
Remove with a slotted spoon to a tray lined with baking paper.
Brush each bun with the beaten egg yolk and sprinkle with the poppy and sesame seeds.
Bake for 15–20 minutes in the centre of the oven until the buns are golden brown.
Leave to cool for a little while.
Serve with butter and fruit jam, or with any savoury fillings of your choice.
Extracted from Ren Behan’s The Sweet Polish Kitchen (Pavilion Books). Image credit: Nassima Rothacker.
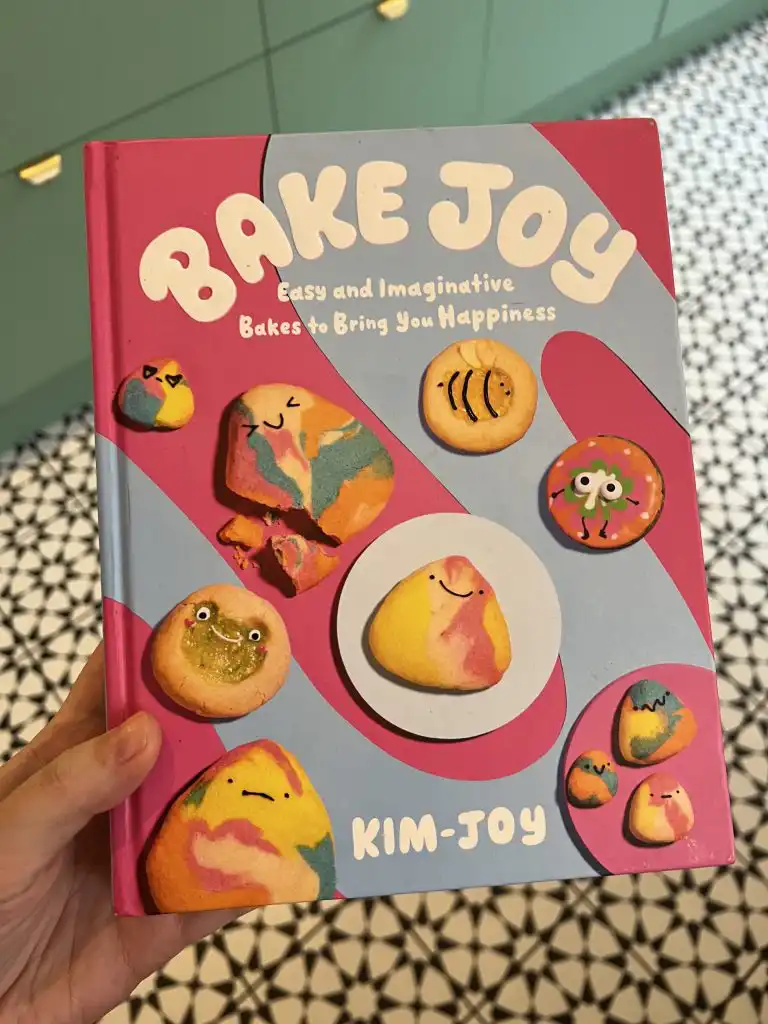
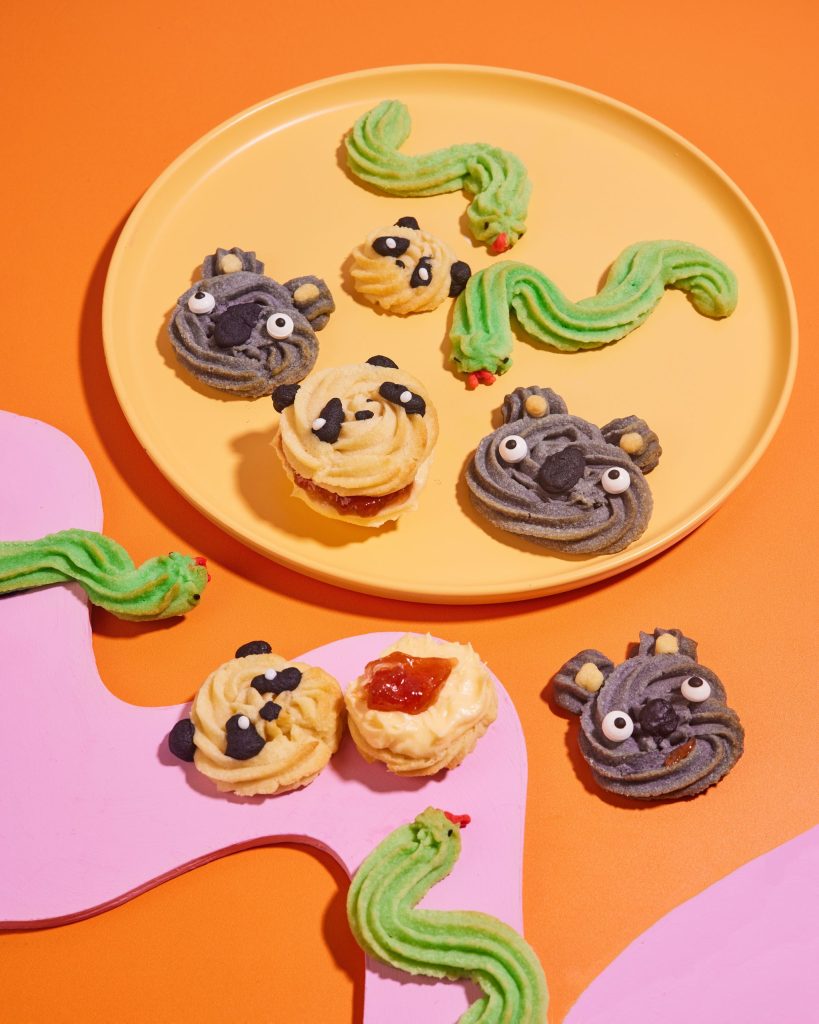
Viennese Whirl Snakes (and Other Variations)
These are delicate, melt-in-your-mouth sensations – even more buttery than your ordinary shortbread! You can share them with friends, package them up as gifts, or just keep them all for yourself. Any kind of wiggly shape makes a snake, and once you put faces on koalas and pandas they are instantly brought alive.
This recipe is also in my book, Bake Joy.
MAKES 12 SANDWICH BISCUITS (OR 24 IF NOT SANDWICHED)
250g salted butter (or use 80%-fat vegan butter)
IMPORTANT NOTE: your butter has to very very soft, as soft as it can be without it being melted. I find it helpful to microwave the butter until it’s slightly melty, then stir together. It should not look melted anymore, but be very soft, almost melted but not quite. It needs to be as soft and spreadable as you can get it!
70g icing sugar
1 tsp vanilla extract
250g plain flour (or use a gluten-free flour blend plus ½ tsp xanthan gum)
30g cornflour
TO DECORATE (OPTIONAL, DEPENDING ON DESIGN)
food dyes
sprinkles or sesame seeds for eyes
Quick Icing (little bit of icing sugar and some water to make a pipeable paste)
FILLING
100g unsalted butter (or use 80% fat vegan butter), softened and cubed
200g icing sugar
1 tsp vanilla extract
25g custard powder
2 Tbsp milk (or 1-2 Tbsp plant-based milk – you may need less as plant-based butter generally has more liquid)
Jam flavour of your choice (I used raspberry in the video but you can do rhubarb to make a rhubarb and custard filling!)
METHOD
1 / Line baking sheets with baking paper.
2 / To make the cookies, add the soft butter (make sure it’s VERY soft – see notes in ingredients list), icing sugar and vanilla extract to a large mixing bowl. Beat together until soft, smooth and combined.
3 / Add the flour (or flour plus xanthan gum) and cornflour, and mix by hand until just combined.
4 / Follow the different instructions, below, to create different shapes. Once you have added your food dyes, spoon the mixture into a large piping bag fitted with a large open star tip to pipe the face or body.
Tip: You can customize further with sprinkles (either before or after baking – though if you are using before baking, make sure they are bake-safe! and your own colour variations.)
5 / Chill the sheets of piped cookie dough in the fridge for at least 30 minutes to ensure the ridges keep their definition. Meanwhile, preheat the oven to 170°C fan [190°C/375°F/Gas mark 5).
6 / Bake for 12-15 minutes or until ever so slightly browned on the edges. Cool on the baking trays for 10 minutes – this will allow them to firm up. Transfer to a wire rack to finish cooling.
7 / Meanwhile, make the filling. Add the butter, icing sugar, vanilla extract and custard powder to a large mixing bow. Beat on high speed until pale in colour and fluffy. Add the milk (if using plant-based milk, you may need less to soften the consistency and make it easier to spread. then whisk again.
8 / if filling the cookies, turn over half of the cookies so they are face down. Use a spoon to spread the custard cream filling onto the backs of the cookies.
Alteratively, put the filling into a piping bag and cut a small opening, then pipe an equal amount on to each cookie. Spoon a little jam on top (not too much or it will ooze out!), then sandwich with the remaining cookies.
Below are the instructions for piping the different animals!
FOR THE SNAKE COOKIES
4a: 1 / Set aside a teaspoonful of the mixture: this will be coloured red for the tongues. Colour the remaining mixture with green food dye.
4b: 2 / Spoon the green mixture into a large piping bag fitted with a large open star tip, then pipe the bodies.
4c: 3 / To make the tongues, mix the reserved teaspoon of mixture with red food dye. Put this in a small piping bag and cut a small opening, then pipe the tongues on to the green snake shapes.
4d: 4 / For the eyes, press on black sesame seeds or similar before chilling and baking
FOR THE PANDA COOKIES
4a: 1 / Set aside half a tablespoonful of the mixture: this will be coloured black for the facial details. Leave the remaining mixture plain.
4b: 2 / Spoon the plain mixture into a large piping bag fitted with a large open star tip, then pipe round swirls for the faces.
4c: 3 / To make the facial details, mix the reserved mixture with black food dye. Put this in a small piping bag and cut a small opening, then pipe the eyes, ears and nose.
4d: 4 / After baking, use a little quick icing to add the white dots for the eyes
FOR THE KOALAS
4a: 1 / Set aside half a tablespoonful of the mixture: this is for the noses and inner ears. Colour the remaining mixture with a little black food dye to make a grey mixture.
4b: 2 / Spoon the grey mixture into a large piping bag fitted with a large open star tip, then pipe round faces and the ears.
4c: 3 / Place half the reserved (plain) mixture into a small piping bag. Add black food dye to colour the remaining half of the reserved mixture, and place this in another small piping bag. Cut small openings on both bags. Use the black mixture to pipe the noses. Then use the plain mixture to pipe the inner ears.
4d: 4 / After baking, use a little quick icing to stick on edible eye sprinkles.
And enjoy!! You can make so many more different animal shapes with this recipe so you could experiment. They’re really fun and satisfying to do!